
Friday, April 29, 2011

Wednesday, April 27, 2011
Tutu

Supplies:
- Two rolls of 6" tulle in any color or color combination you'd like. You could certainly use more if you'd like. Two rolls takes care of any size up. You could also have it cut from the bolt if you can't find the rolls....... it's cheaper. It's slippery and a pain sometimes. Cut it in 6" widths and then in half lengthwise...... you have less options with length but still works great.
- Elastic........ enough to go around tummy.
- Scissors or rotary blade/cutting mat.
- The first thing you need to do is measure your little girl. You need to measure her tummy. I measured Keira's tummy and then added 2" and cut my elastic to this measurement. After it it cut, you want to sew in with a zig zag stitch on your machine to make it a circle. (It can be done by hand too, that is what I did).
- Next, you need to decide how long you wish your tutu to be. Do you want it short and poofy or long and puffy. Take your measuring tape and measure from her waist to where you want the tutu to end. Double this measurement. I like to lay the two rolls together and cut them at the same time. I used my rotary cutter and mat (you can use scissors).
- Now the fun. Take one piece of the cut tulle and slip it under the elastic and fold in half and loop around the elastic. Pull it through into a knot. That's all there is to it from here on out. Continue adding the tulle pieces on the elastic until it fills up.
Monday, April 25, 2011
Rose Wand

Sunday, April 24, 2011

Saturday, April 23, 2011

Friday, April 22, 2011
Blue Jean Purse
Happy Earth Day!!!


Thursday, April 21, 2011
Chocolate chick and bunny peeps

How can you improve Marshmallow Peeps, the perennial Easter favorite? By adding chocolate, of course! These chocolate-dipped Peeps are adorable and so easy to make. Sprinkles are strictly optional, but seem to be a hit with the little ones.
Ingredients:
- 1 package Marshmallow Peeps
- 4 ounces semi-sweet chocolate (can substitute 4 oz chocolate coating)
- 1 tsp shortening
- Sprinkles (optional)
- Chopped nuts (optional)
Preparation:
1. Prepare a baking sheet by lining it with wax paper.2. Melt the chocolate and the shortening together in the microwave. If using chocolate coating, the shortening can be omitted.
3. Holding the Peep by the head, dip the bottom in the chocolate, covering a scant ¼ inch with chocolate. Shake it several times to remove excess chocolate before carefully placing it on the baking sheet. For the Bunnies dipped the whole bunny into the chocolate.
4. If desired, add sprinkles on the chocolate while still wet.
5. Place the candy in the refrigerator to set the chocolate for 10 minutes.
Easter Egg Nest
 |
| Easter Egg Nest (oops wrong date on camera should be 04/19/2011) |
Egg Carton supplies
egg carton
green paint and brush
easter grass
green crepe paper roll
glue
How-to
1. Cut out groups of 4 adjacent cups of the egg cartons. Keep the cups attached together.
2. Paint the cups green inside and out. Set aside and let dry.
3. Cut Easter grass into smaller pieces. Drizzle glue inside all of the cups, then sprinkle the grass pieces inside (to make a nest affect) of about 3/4 of the way up.
4. Measure the crepe paper around the outside of the nest and cut a little longer. Cut 3 of these. Apply glue around the outside of the top rim and glue one crepe paper piece in place ( like a skirt). Glue the 2nd an inch or so above the rim. Glue the 3rd piece even with the second (right on top)
5. Cut small slits on the top of the crepe paper to make (grass) all around the four sides. Pull apart the two layers and fluff out.
6. Fill the nest with Easter goodies.
We put inside two painted plastic easter eggs and chocolate covered chicks and bunny peeps. See the cholcolate covered peeps post to make these.
Easter egg holders
 |
| Easter Egg Holder and egg made by Kylie (oops date is wrong on camera- should be 04/19/2011) |
Supplies
egg carton
sissors
paint
glue
How-to:
-Cut the egg carton into (cups).
-Round the edges with sissors so the top is even or cut like a wave.
-Paint the egg cup inside and out. Leave to dry. Once dried, glue the two bottoms together.
-We tied a ribbon around the middle.
Now it is ready to display your egg.
The egg in the holder that is in this picture is made from a plastic Easter egg that was painted.
This project was made by my 7 year old niece Kylie. She did a great job.
Tuesday, April 19, 2011
Face Cloth Chick

Materials:
- face cloth
- narrow ribbon(s)
- 2 googly eyes
- small piece of yellow felt
- needle and thread to match the face cloth and/or hot glue gun


You're done!
Monday, April 18, 2011
Boo Boo Bunny


Boo Boo Bunny
Materials:
- face cloth
- narrow ribbon(s)
- 2 googly eyes
- 2 pompoms (one large for the tail, one smaller for the nose)
- needle and thread to match the face cloth and/or hot glue gun


If you're not into sewing, you can tack the loose fabric down with hot glue. If you use hot glue you won't be able to take the bunny apart and use the face cloth later, though!

If you choose to be creative you can add flowers, mini plastic Easter eggs, or felt cut-outs to your bunny as decoration. But you can also keep the bunny simple.
Boo Boo Bunny Poem
Place this poem and some candy inside a plastic egg and put it in the back of the bunny where the ice will go. It makes a cute addition to any Easter basket!Boo Boo Bunny goes hippity-hoppity
Boo Boo's ears are flippitty-floppity.
His egg holds a special sweet treat,
He's bringing just for you to eat.
Save the egg, don't throw it away,
You may need it another day.
When you get hurt and have a boo-boo,
And you feel sad and go "boo-hoo",
Open the egg and put in some ice,
Boo-Boo's cold egg will help it feel nice.
Friday, April 15, 2011
Tissue paper flowers
I made these tissue paper flowers for Keira's birthday party. For my flowers I used a tissue paper package and cut the paper in half and used 8 layers of tissue paper using two colors for each flower.

Supplies:
 1 package of multicolored tissue or crepe paper
1 package of green pipe cleaners
Scissors
Directions: Take four to five sheets of the tissue paper and layer them (if you want multicolored flowers, use different colors). Cut into 8-inch squares. Keeping the sheets layered, take one set of squares and fold it like an accordion so it looks like a thin rectangle. At the center of the rectangle, cut a small v-shaped notch on both sides. Take the end of a pipe cleaner and twist it around the notch. With the stem pointing straight down, gently pull up one layer of tissue into the center. Pull up the remaining layers, one by one. Repeat for the other side of the flower . Once all the layers are pulled up, fluff them in place to look natural. Continue making more flowers with the remaining stacks of squares.
Tips and variations: For sturdier stems, wrap two pipe cleaners together. Cut smaller or larger squares to change the size of your flowers. Add more layers for thicker flowers or less layers for thinner ones. For a shiny effect, dip the top edges in white glue and then dip in loose glitter. Glue a pin on the back of a flower for a fluffy lapel decoration. Make smaller flowers and string them together as garland.

Supplies:
Directions: Take four to five sheets of the tissue paper and layer them (if you want multicolored flowers, use different colors). Cut into 8-inch squares. Keeping the sheets layered, take one set of squares and fold it like an accordion so it looks like a thin rectangle. At the center of the rectangle, cut a small v-shaped notch on both sides. Take the end of a pipe cleaner and twist it around the notch. With the stem pointing straight down, gently pull up one layer of tissue into the center. Pull up the remaining layers, one by one. Repeat for the other side of the
Tips and variations: For sturdier stems, wrap two pipe cleaners together. Cut smaller or larger squares to change the size of your flowers. Add more layers for thicker flowers or less layers for thinner ones. For a shiny effect, dip the top edges in white glue and then dip in loose glitter. Glue a pin on the back of a flower for a fluffy lapel decoration. Make smaller flowers and string them together as garland.
Tuesday, April 12, 2011
Alice in Wonderland Tea Party


Sunday, April 10, 2011
Alice in Wonderland Characters


Thursday, April 7, 2011
Cat in the Hat hair bows
The project I made yesturday was Cat in the Hat hair bows for Keira's cousins. I love how they turned out. Her cousins Birthday is what inpired me to make these bows.

Be sure to comment on this weeks Friday Freebie. Tommorow is the drawing for the winner and a new freebie will be posted.

Be sure to comment on this weeks Friday Freebie. Tommorow is the drawing for the winner and a new freebie will be posted.
Wednesday, April 6, 2011

Monday, April 4, 2011
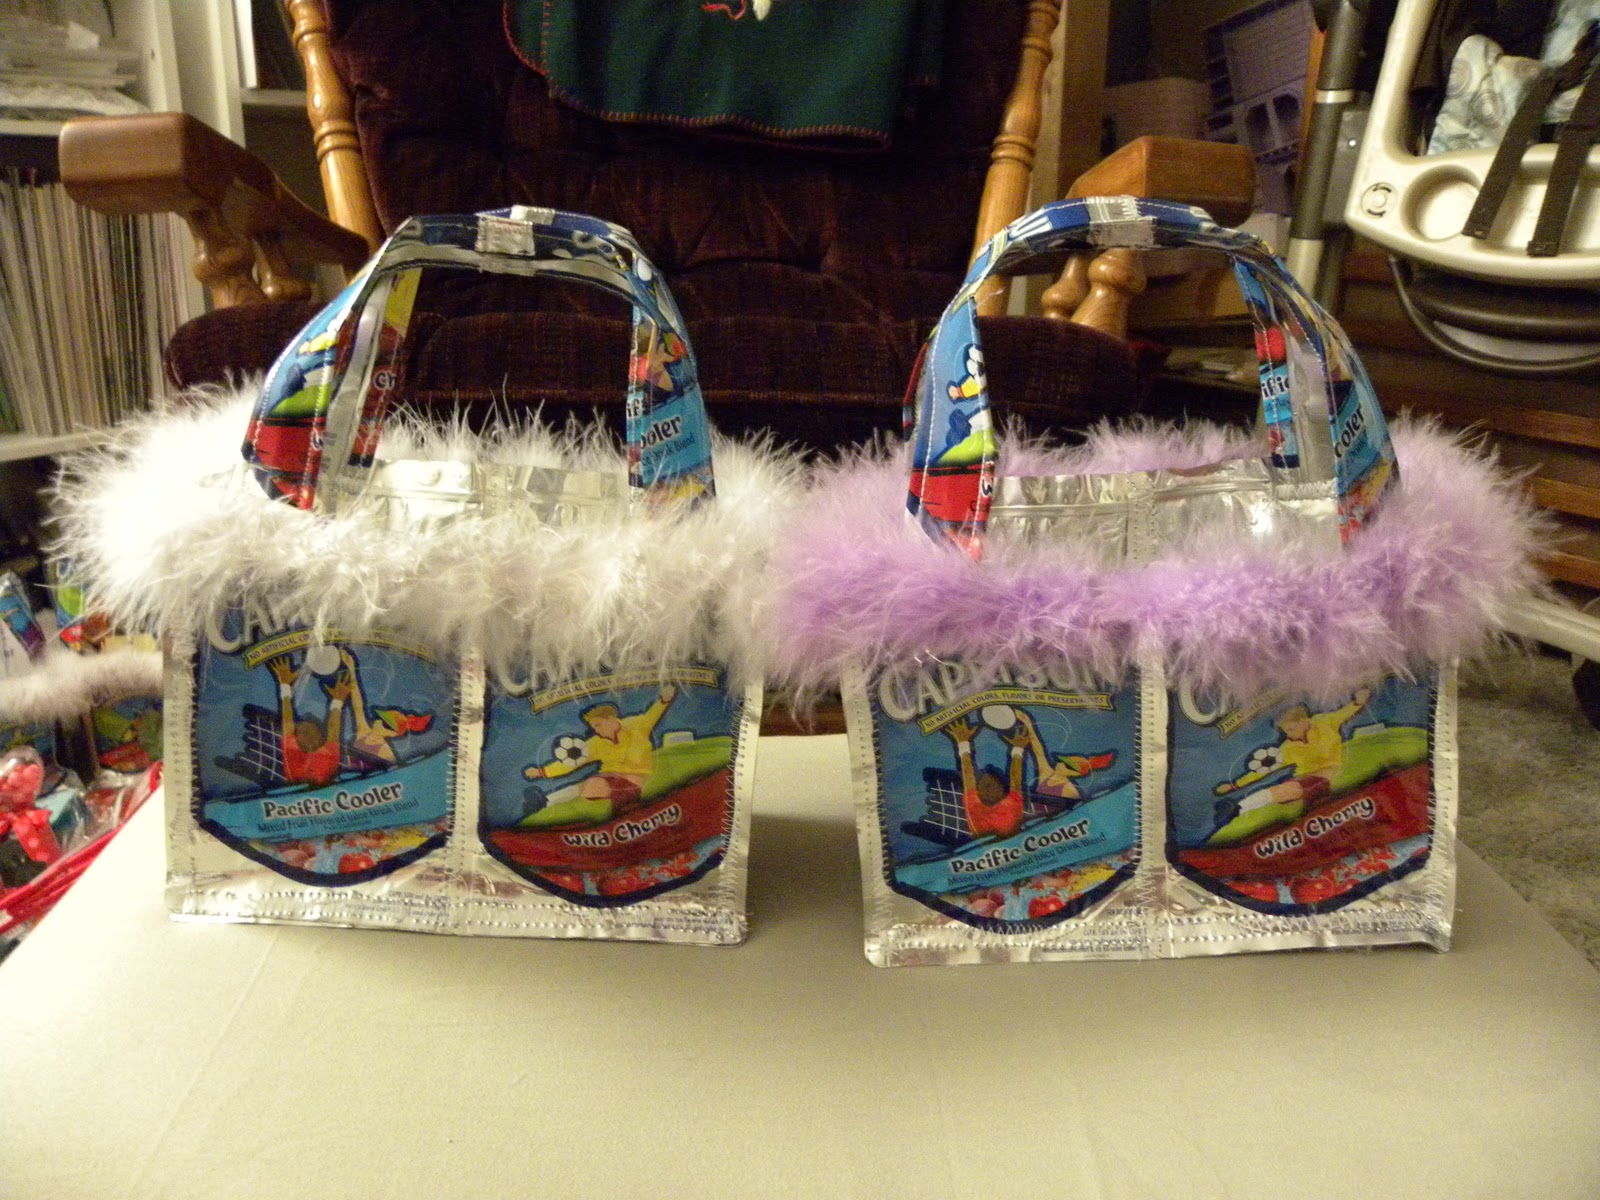
Juice Pouch Purses
Sunday, April 3, 2011
Flip Flops and Hair bow


Subscribe to:
Posts (Atom)